

Among the most popular astrophotography platforms in the advanced astronomy community, NINA (Nighttime Imaging ’N’ Astronomy) stands out for combining complete freedom of configuration: it is a free, open-source application that connects to virtually any ASCOM-compatible device. Its powerful automation engine, detailed sequencing tools, and extensive plugin ecosystem make it a favorite for users who want to push their imaging sessions to the next level, and who are happy to invest time in learning a feature-rich environment. All PrimaLuceLab products connect seamlessly to NINA, and this guide, written with the collaboration of Ronald Brecher, walks you through the specific steps to integrate your GIOTTO smart flat field generator and ALTO telescope cover motor into your NINA workflow.
- Install the latest stable version of N.I.N.A. from the link above. Setup your GIOTTO (and ALTO, if you have one) as directed in the user manual. If using both, only the ALTO will be connected directly to the PC. GIOTTO will be connected to the ALTO using the supplied cable.
- Disconnect the ALTO (or GIOTTO) USB cable from the EAGLE or other PC.
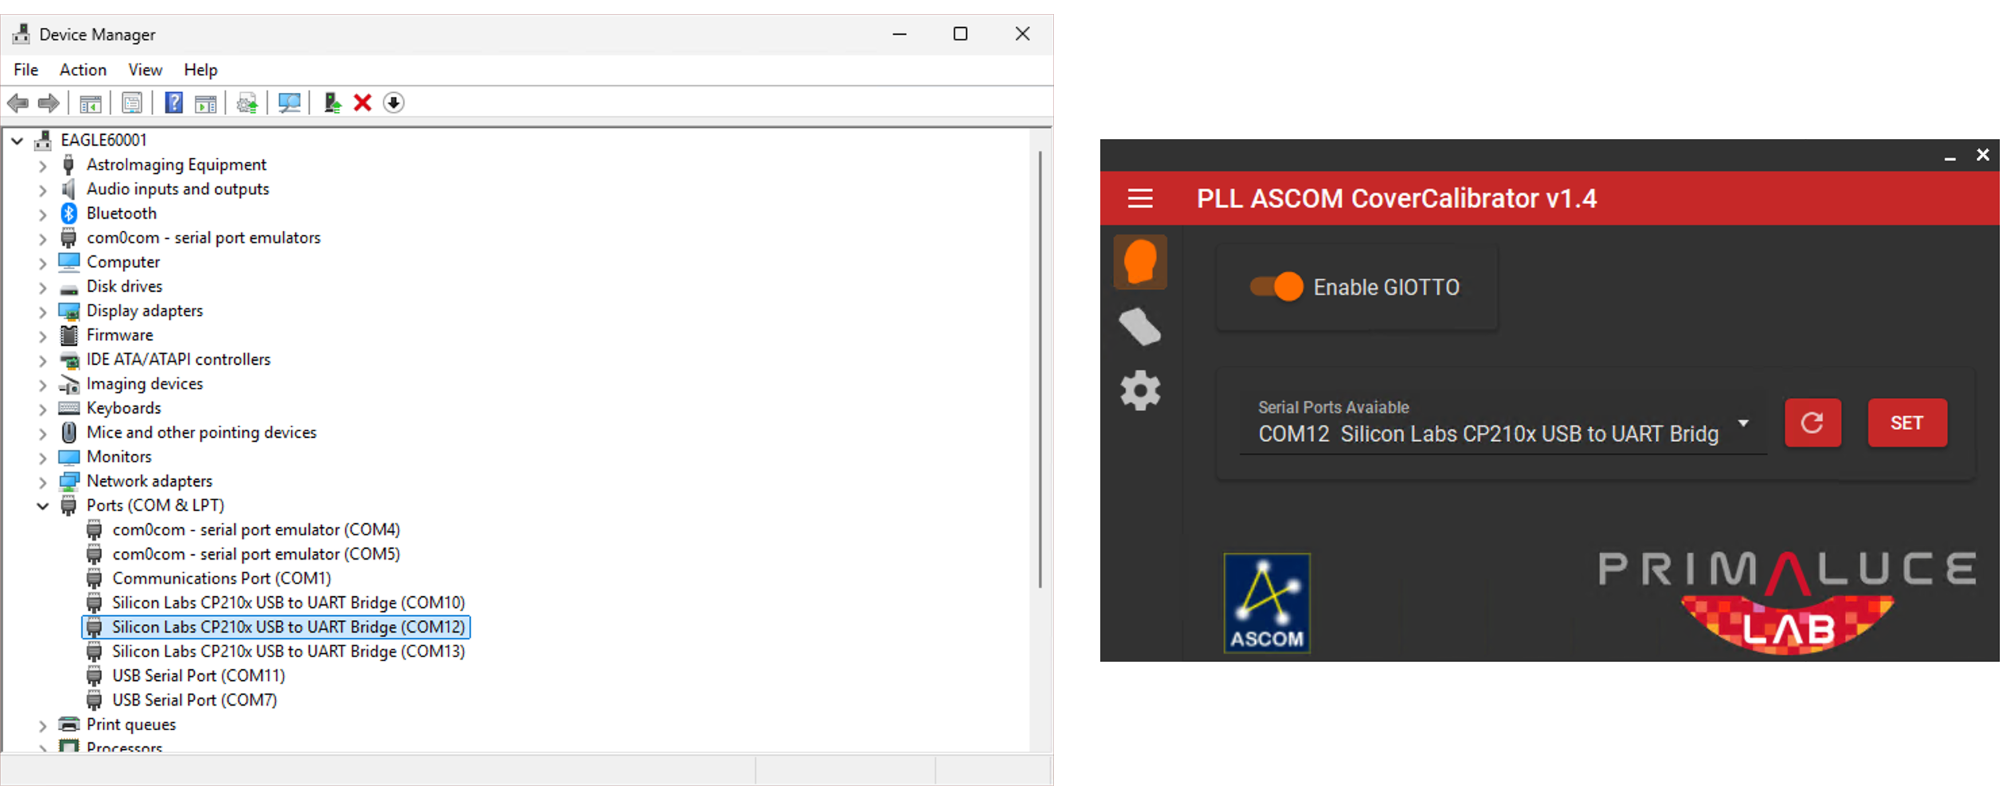
- Click the Windows Start button and begin typing ‘Device Manager.’ When you see the Device Manager, launch it and expand the PORTS section.
- Connect your ALTO or GIOTTO via USB and take note of which COM port appears in the device manager. Jot it down as you may need it later.
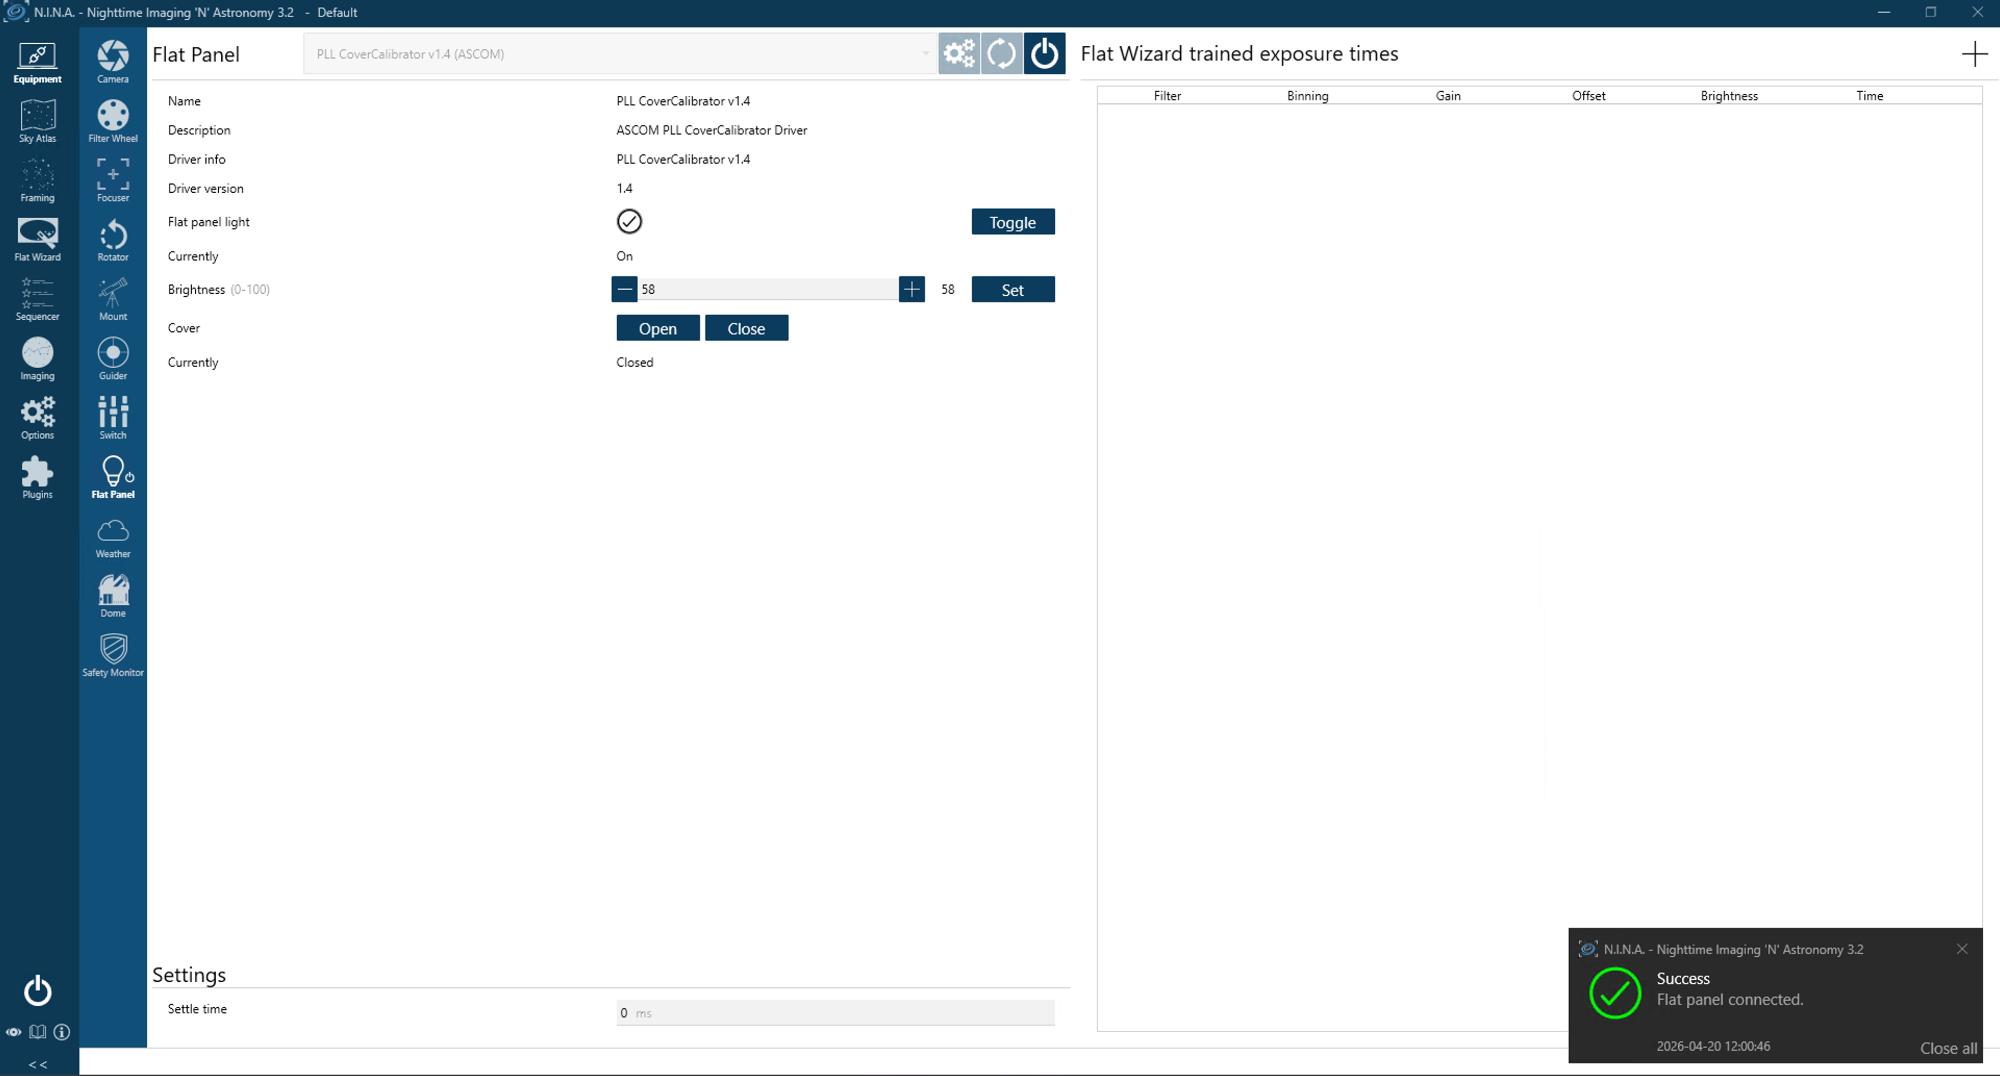
- In NINA, go to the Equipment tab and select Flat Panel.
- Choose the ‘PLL ASCOM Cover Calibrator’ from the drop-down list.
- Click on the gear icon and the ASCOM settings window will open. Setup the cover calibrator based on whether you have ALTO and GIOTTO, or just GIOTTO. From the dropdown list set the COM port to the one you wrote down in step 4 and press SELECT. You can access other ALTO/GIOTTO settings by clicking on the gear icon in the ASCOM driver window .
- Click the Connect button for the focuser.
Once N.I.N.A. connects successfully, information about the flat panel will be displayed. Next, verify that N.I.N.A. can control the cover motor and/or flat panel. Use the controls on the Equipment/Flat Panel tab and verify visually that the ALTO closes and opens as expected. With the ALTO open, toggle GIOTTO’s light on and off and try different brightness settings to ensure it is operating as expected.
Troubleshooting Your Connection
You’ll get an error message if ALTO/GIOTTO fails to connect to your PC. The most common causes of failure to connect are no power, no USB connection, or wrong COM port selected during setup.
- Ensure that ALTO/GIOTTO is connected to power (red power light indicates power).
- Ensure USB is connecting. With Windows Device Manager open and the PORTS section expanded, confirm that ALTO or GIOTTO connection appears and disappears when you plug in and unplug the USB cable (if connected directly to PC) or the connection cable between your ALTO and GIOTTO. Write down the COM port number for the next step.
- If GIOTTO is directly connected to the PC, then ensure you have selected the GIOTTO’s COM port In N.I.N.A. In the Equipment/Flat Panel tab highlight the PLL ASCOM Cover Calibrator driver, and click on the GIOTTO icon. Make sure that the COM port matches the on that appeared in Device Manager in step 2.
- If GIOTTO is connected to ALTO, then ensure you have selected the ALTO’s COM port in N.I.N.A. In the Equipment/Flat Panel tab, highlight the PLL ASCOM Cover Calibrator driver, and click on the ALTO icon. Make sure that the COM port matches the COM port that appeared in Device Manager in step 2.
N.I.N.A. Instructions for GIOTTO/ALTO
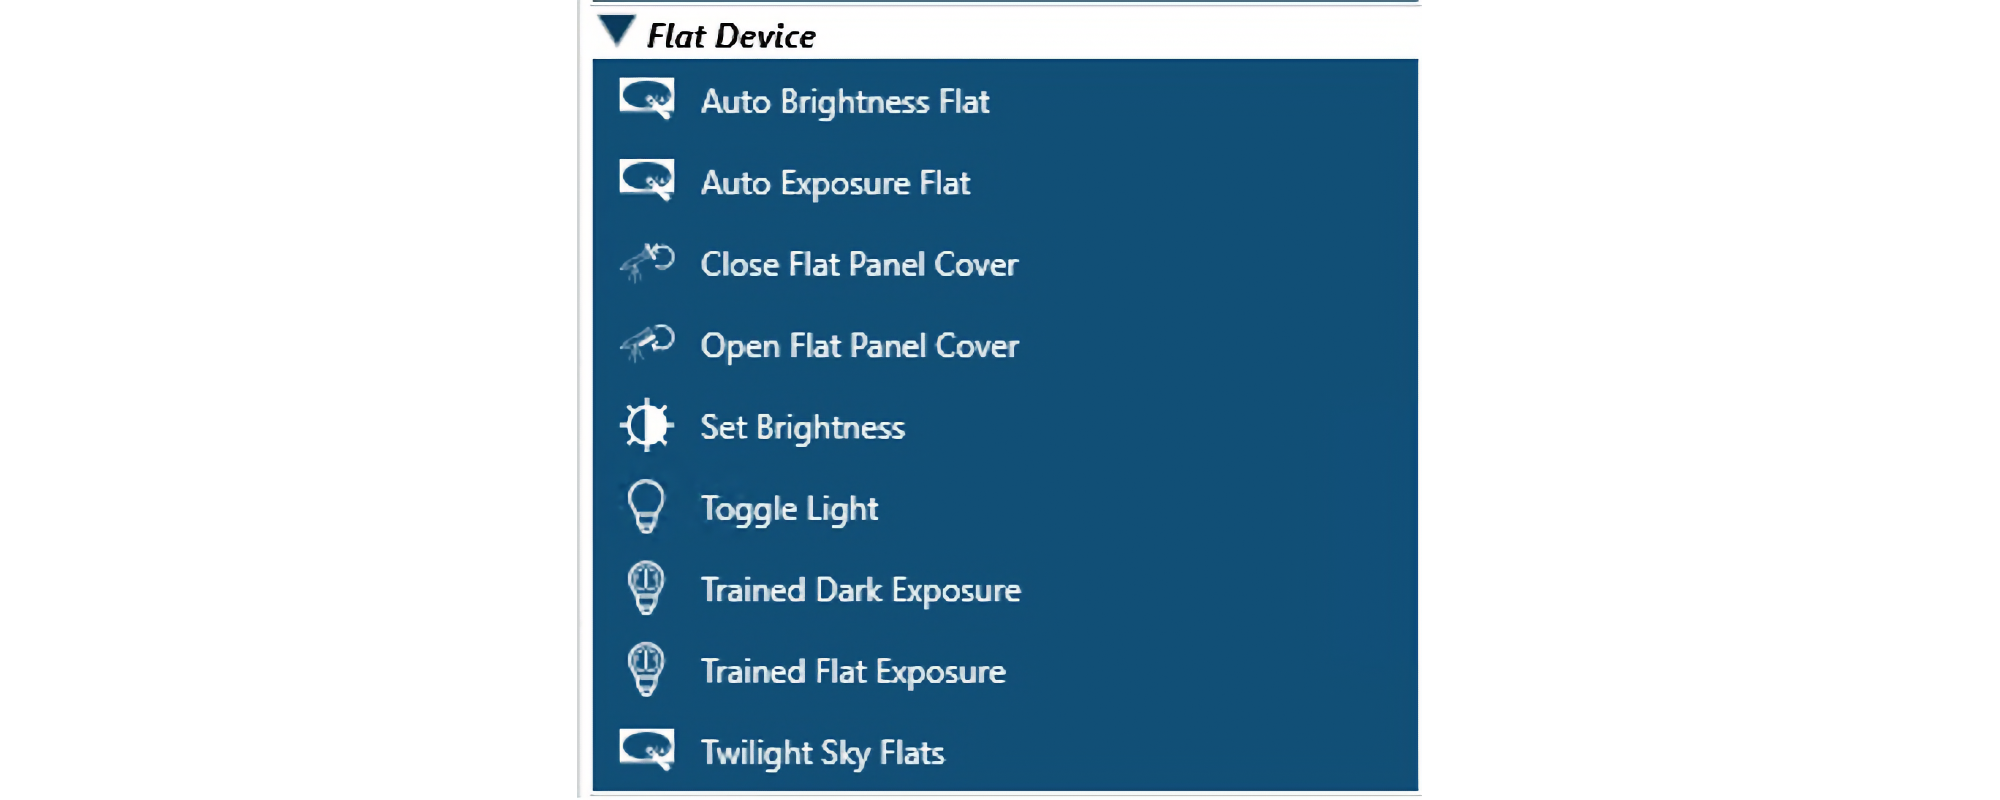
There are two cover instructions that can be placed anywhere in a sequence:
- Close Flat Panel Cover
- Open Flat Panel Cover
They are generally placed before and/or after one of the flat panel instructions described below. They have no parameters that can be adjusted. The seven flat panel instructions summarized in Table 1 can be placed anywhere in a sequence. A good way to get parameter values for these instructions is by using the N.I.N.A. Flat Wizard, which is fully explained in N.I.N.A.’s documentation.
- Auto Brightness Flat
- Auto Exposure Flat
- Set Brightness
- Toggle Light
- Trained Dark Exposure
- Trained Flat Exposure
- Twilight Sky Flats (Note: Not relevant for GIOTTO users)
Additional Resources
See the NINA Plugins tab for many useful plugins that can be used with various equipment. Check regularly for additions and updates.
Detailed documentation for NINA astronomy software is available at https://nighttime-imaging.eu/docs/master/site/
An introduction to NINA is available in Sky & Telescope, September 2023, p. 28-33
Table 1: Summary of N.I.N.A. Flat panel Instructions
| Flat panel Instruction | Use it to … | Example of use |
| Auto Brightness Flat | Acquire flats, adjusting brightness as needed to obtain the specified brightness. | Acquire correctly exposed flats with a constant exposure time. |
| Auto Exposure Flat | Acquire flats, adjusting exposure time s as needed to obtain the specified brightness. | Acquire correctly exposed flats with a constant flat panel brightness. |
| Set Brightness | Manually set the brightness of the flat panel. | Acquire flats when exposure time and brightness have been determined previously. |
| Toggle Light | Turn the flat panel light on or off. | Ensure light is off before starting/resuming imaging. |
| Trained Flat Exposures | Acquire flat frames using brightness and exposure times determined previously using the Flat Wizard. | Acquire flat frames using settings established previously by the Flat Wizard. Exposure time and flat panel brightness are selected using information on the right side of the Equipment/Flat Panel tab. |
| Trained Dark Exposures | Acquire dark frames using exposure times determined previously using the Flat Wizard. | Acquire dark frames using settings established previously by the Flat Wizard. Exposure time is selected using information on the right side of the Equipment/Flat Panel tab. |
| Twilight Sky Flats | Acquire flat frames using the twilight sky as the light source. | Not relevant for users of GIOTTO. |