

NINA astronomy imaging suite (Nighttime Imaging ’N’ Astronomy) is a powerful, free, open-source astrophotography software known for its broad ASCOM hardware compatibility, advanced automation, and deep customization, making it ideal for users who want full control of complex imaging sessions and remote observatories. Thanks to its flexibility and modular architecture, NINA is perfectly suited to be used together with the EAGLE computer, allowing you to control EAGLE ports and import data from its sensors. In this guide, written with the collaboration of Ronald Brecher, you will find the main steps and recommended practices for using NINA astronomy imaging suite with EAGLE, configuring a reliable and efficient imaging setup for both local and remote astrophotography.
Connecting EAGLE Switch and Observing Conditions drivers to N.I.N.A.
- Install onto the EAGLE the latest stable version of N.I.N.A. from the link above. Set your EAGLE up as directed in the user manual.
- Install the PLL ASCOM Observing Conditions and and the PLL Switch drivers that are included in the most current “EAGLE X software package”.
- In N.I.N.A., go to the Equipment tab and select Switch.
- Choose the ‘PLL ASCOM Switch’ from the drop-down list.
- Click the Connect button.
- Confirm that the EAGLE is detected. Click OK to close the window or one of the various buttons along the left side to see the status of power and data ports.
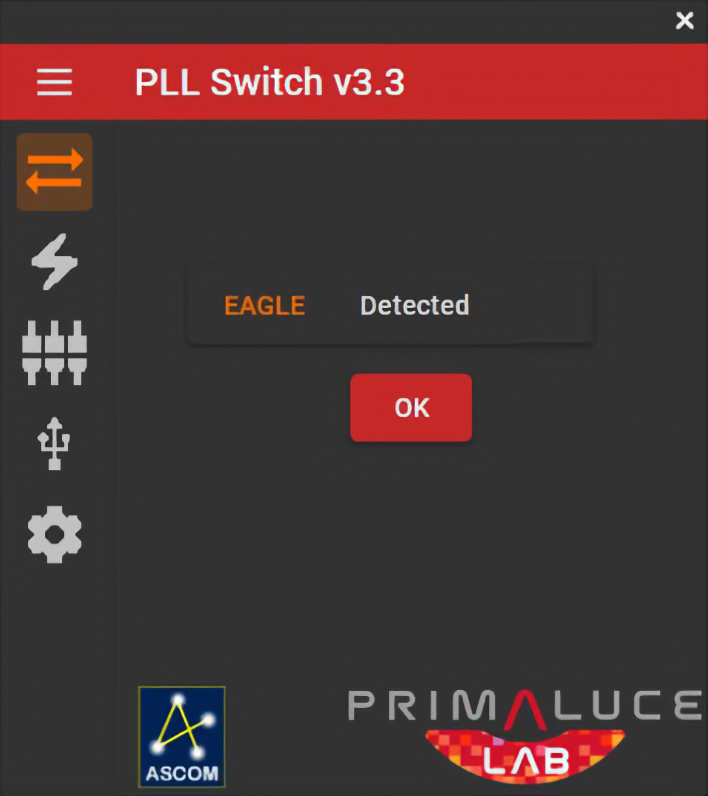 Figure 1: PLL ASCOM Driver Interface for EAGLE Switch connection
- Click Connect on the Switch tab to connect the Switch to NINA. The screen will look similar to Figure 2. Settings on the EAGLE can be changed from here.
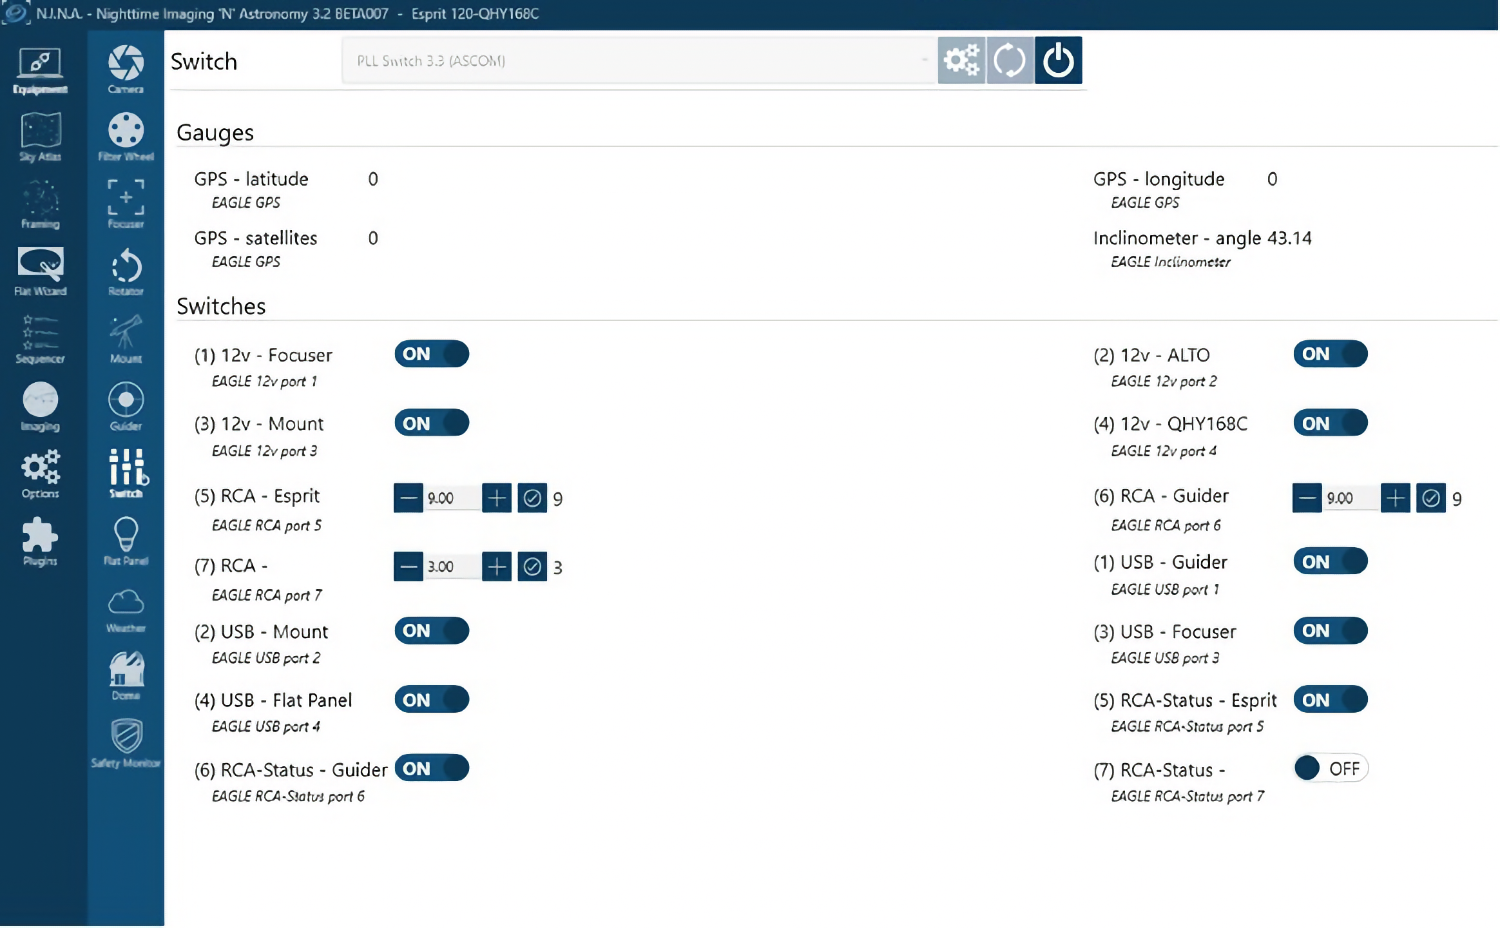 Figure 2: PLL ASCOM EAGLE Switch control screen
- In N.I.N.A., go to the Equipment tab and select Weather.
- Choose the ‘PLL ASCOM Observing Conditions’ from the drop-down list.
- Click the Connect button.
- Confirm that the EAGLE is detected. Click OK to close the window or click the Live Data button along the left side to see the data being reported by ECCO (if connected).
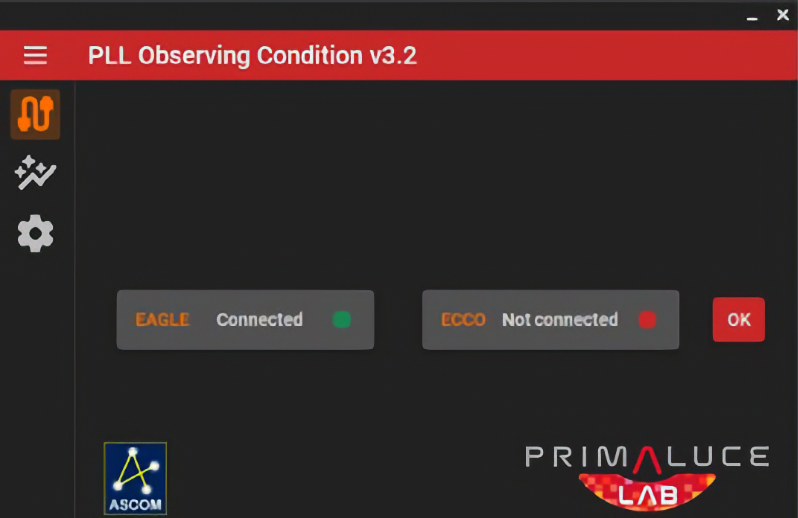 Figure 3: PLL ASCOM Driver Interface for EAGLE Observing Conditions connection
- Confirm that the EAGLE EYE is reporting sky brightness. If an ECCO is connected, other observing conditions will also be reported (Figure 4).
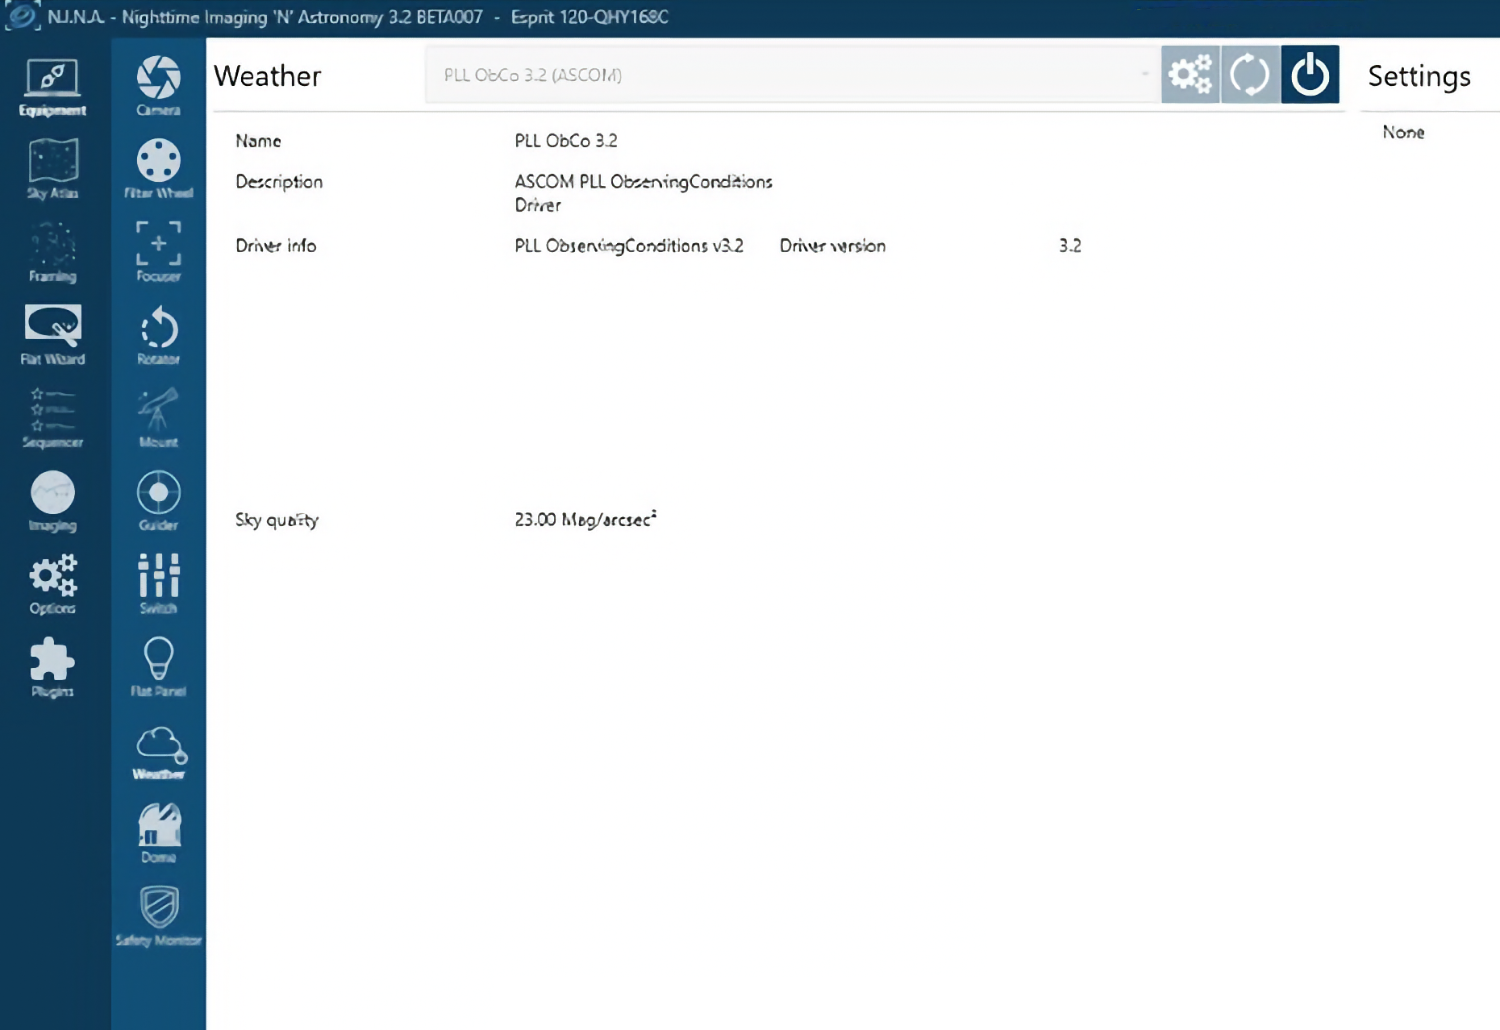
Figure 4: EAGLE Observing Conditions report (no ECCO attached). Additional information is reported when ECCO is connected.
Troubleshooting your connection
The most common cause of failure to connect to EAGLE drivers is having no ASCOM drivers or out-of-date drivers. To ensure you have the most recent versions, download the current “EAGLE X software package” from https://www.primalucelab.com/info/downloads.html. Follow all instructions to first update the EAGLE Manager X (if necessary). Then install the ASCOM drivers for the Switch and Observing Conditions as described above.
Using Switch and Observing Conditions drivers in N.I.N.A.
There is one instruction for controlling EAGLE Switch functions that can be placed anywhere in a sequence. The Set Switch Value instruction sets the value for a port. Ports are referenced using switch numbers in parentheses as shown in Figure 2. This instruction is useful for turning devices on or off at the beginning and end of an imaging run, or changing a port setting mid-sequence.
There are no instructions for controlling EAGLE Observing Conditions functions that can be placed within a sequence. However, sky quality meter reading reported by the EAGLE EYE can be automatically included in image file names by including the string $$SQM$$ within the Light file-naming template available from the Options/Imaging tab of N.I.N.A.
Take your first image with N.I.N.A.
Now that you have all of your PrimaLuceLab and other equipment connected and confirmed that it can be controlled within N.I.N.A., here are some basic steps for taking your first image with N.I.N.A.:
- Slew your telescope to the desired target, either manually, or using the N.I.N.A. Equipment/Telescope tab, or using other software.
- On the Imaging tab, select the Image Window and click the camera-shutter icon. Take a short exposure – say 2-5 seconds and evaluate focus. To get multiple exposures, turn on Loop. To save exposures, turn on Save.
- If the image is not in focus, use the controls in the Focuser window of the Imaging tab while looping short (2-5 seconds) exposures to get close to focus; then click the Autofocus button in the Autofocus window of the Imaging tab.
Sample N.I.N.A. Sequence
While it is possible to acquire your data manually, automation using N.I.N.A. or other software is likely to make your imaging experience more efficient, with more consistent, repeatable results (for example consistency with camera rotation from night to night when shooting multiple objects with different rotations) and more and better data (for example, better focus, efficient use of time for non-imaging tasks). N.I.N.A. has a Legacy Sequencer, but it is not recommended. We recommend you use the ‘Advanced Sequencer.’
Figures 5 and 6 show a sample sequence for the N.I.N.A. Advanced Sequencer, assuming you have connections to EAGLE Switch, OSC camera, mount, autoguider, PrimaLuceLab focuser, ARCO, ALTO and GIOTTO. Every N.I.N.A. imaging sequence can contain one or all of the following three parts: startup tasks, imaging tasks and shutdown tasks. Startup and shutdown steps are typically the same or similar from night to night; imaging tasks need to be updated depending on your target, equipment and planned imaging run. More than one target can be included in an imaging sequence, so you can change targets automatically during an imaging run. The sequence contains a few brief annotations. The following proovides step-by-step detail on what the sequence does. Ignore the red exclamation marks in the figures; these appear when equipment is not connected.
To fully appreciate the capabilities of automated imaging with N.I.N.A., we strongly recommend you read ‘An introduction to N.I.N.A.’ (Sky & Telescope, September 2023, p. 28-33).
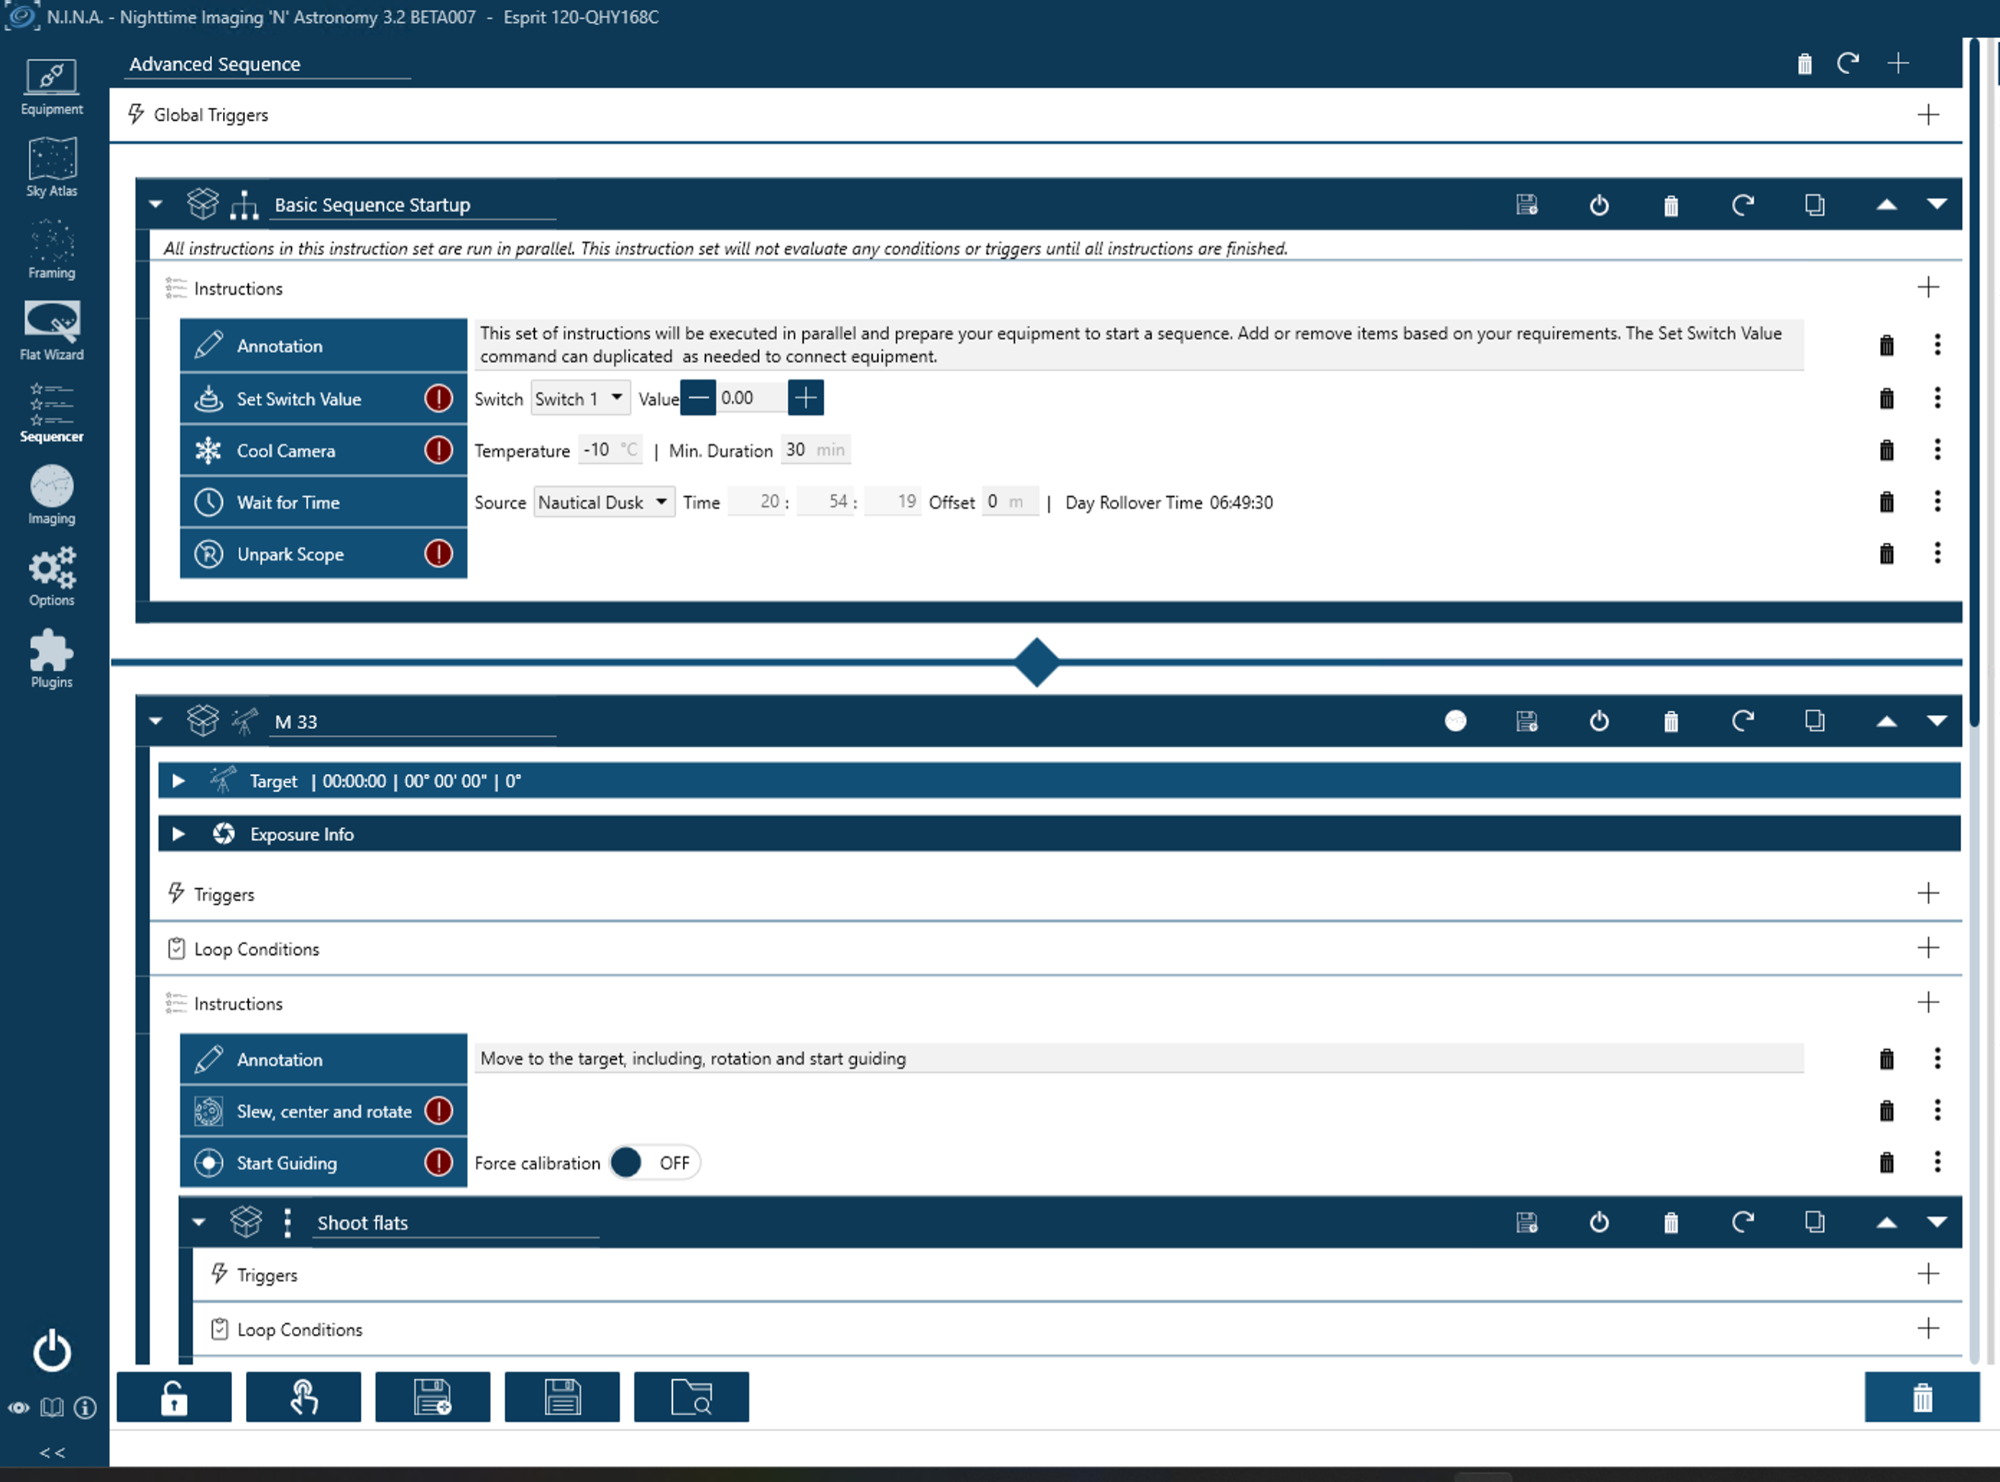
Figure 5: Sample N.I.N.A. Sequence, Part 1

Figure 6: Sample N.I.N.A. Sequence, Part 2
- STARTUP TASKS (top of Figure 5)
- Turn on switches as needed (repeat this line as needed)
- Cool the camera.
- Wait for the specified time of day
- Unpark the telescope.
- M33 (MAIN IMAGING TASKS) (bottom of Figure 5)
- Check the rotation of the camera and then automatically rotate ARCO to match the settings specified in the Target dropdown.
- Slew slew to the target, plate solve and automatically center the target.
- Start autoguiding
- M33 (MAIN IMAGING TASKS) continued (top of Figure 6)
- Shoot flats using GIOTTO:
- Close GIOTTO using ALTO
- Shoot 16 flats of 5s each using the specified settings (determined previously with Flat Wizard or manually)
- Open GIOTTO using ALTO
- Begin capturing images using the specified settings, and continue until nautical dawn, running Autofocus (using ESATTO or SENSO SESTO) after every 12th
- SHUTDOWN TASKS
- Park the telescope
- warm the camera gradually to ambient temperature
- disconnect all equipment from N.I.N.A
Additional Resources
See the N.I.N.A. Plugins tab for many useful plugins that can be used with various equipment. Check regularly for additions and updates.
Detailed documentation for N.I.N.A. is available at https://nighttime-imaging.eu/docs/master/site/
An introduction to N.I.N.A. is available in Sky & Telescope, September 2023, p. 28-33