

NINA astronomy imaging suite (Nighttime Imaging ’N’ Astronomy) is a powerful, free, open-source astrophotography software known for its broad ASCOM hardware compatibility, advanced automation, and deep customization, making it ideal for users who want full control of complex imaging sessions but are comfortable with a steeper learning curve. NINA astronomy software is easy to install, it excels in flexibility, and it supports a very wide range of equipment and options. It works with all PrimaLuceLab equipment, and it is one of the most used astrophotography softwares among advanced users. In this guide, written with the collaboration of Ronald Brecher, you will find the main steps for controlling your SESTO SENSO and ESATTO with NINA.
- Install the latest stable version of NINA from the link above. Setup your SESTO SENSO or ESATTO as directed in the user manual.
- Disconnect the SESTO SENSO or ESATTO USB cable from the EAGLE or other PC.
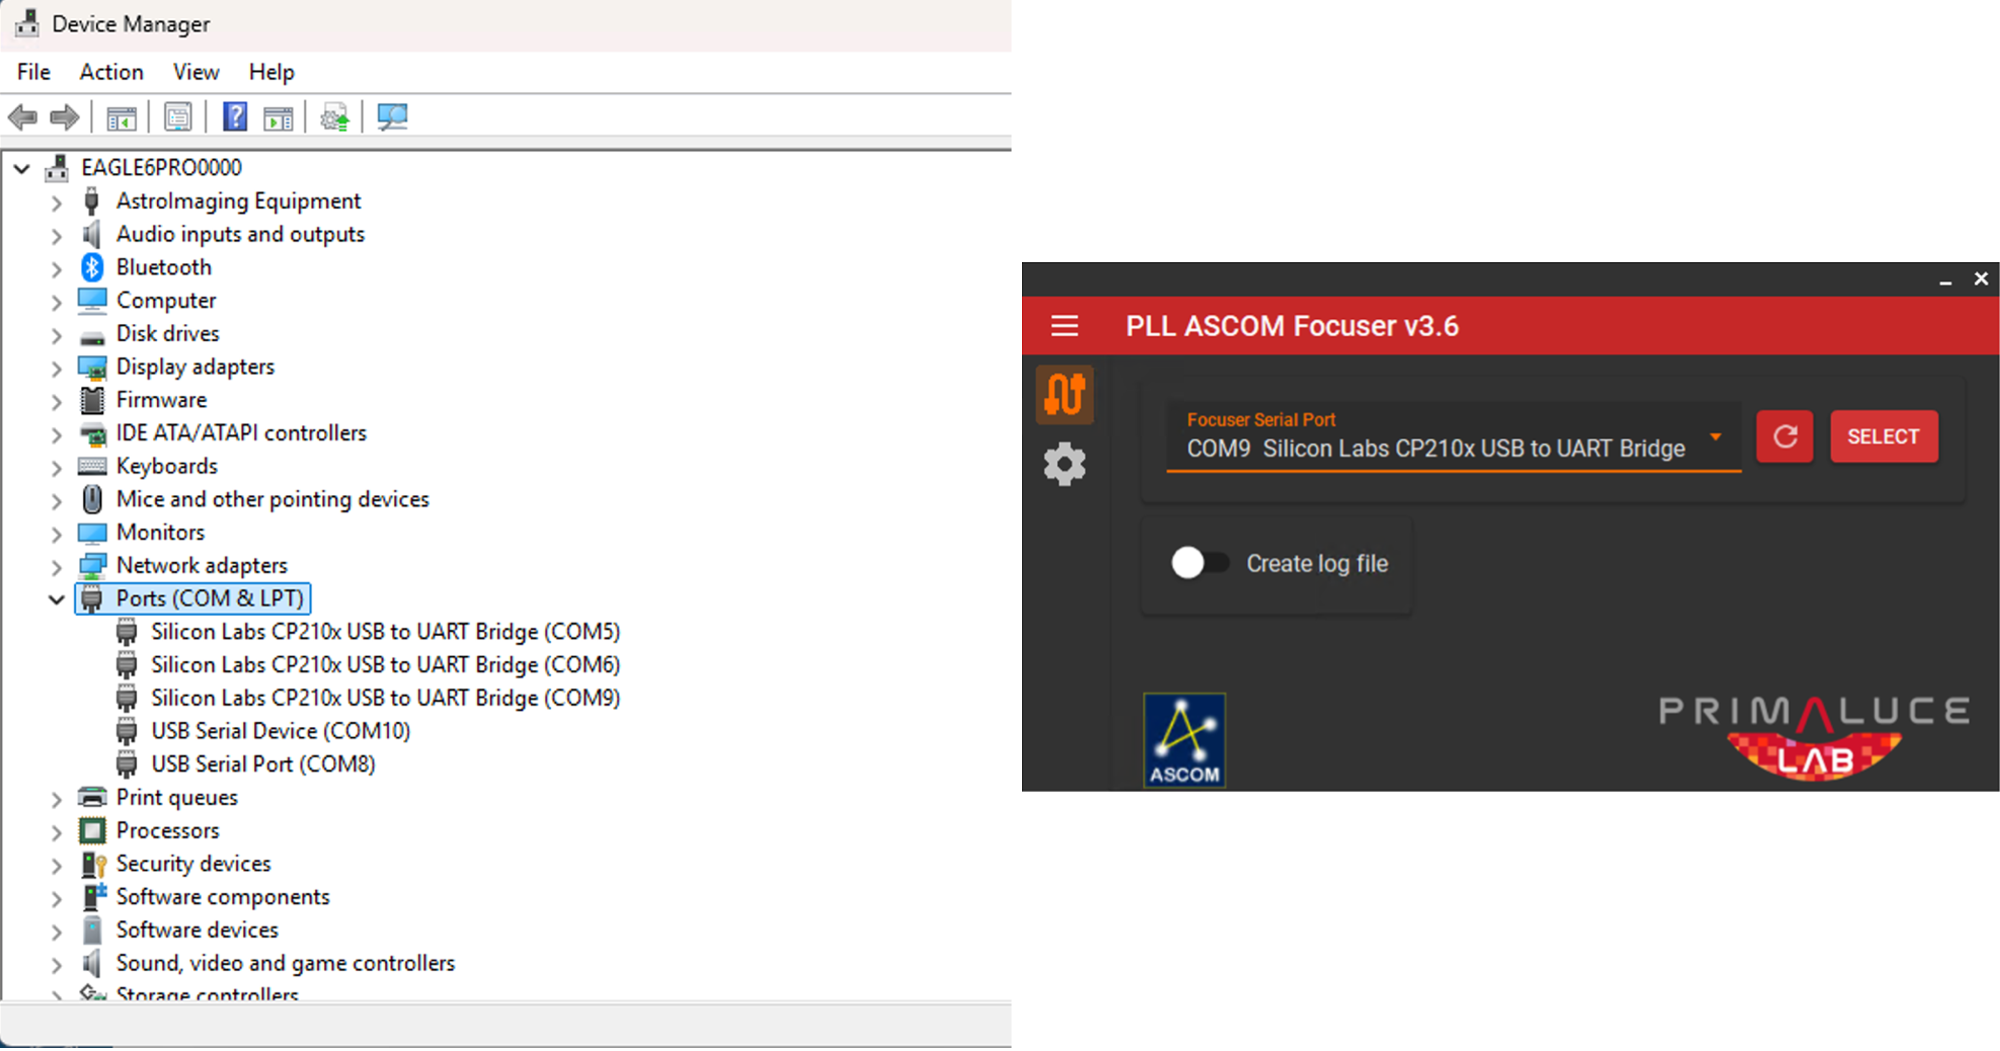
- Click the Windows Start button and begin typing ‘Device Manager.’ When you see the Device Manager, launch it and expand the PORTS section.
- Connect your SESTO SENSO or ESATTO via USB and take note of which COM port appears in the device manager. Jot it down as you will need it later.
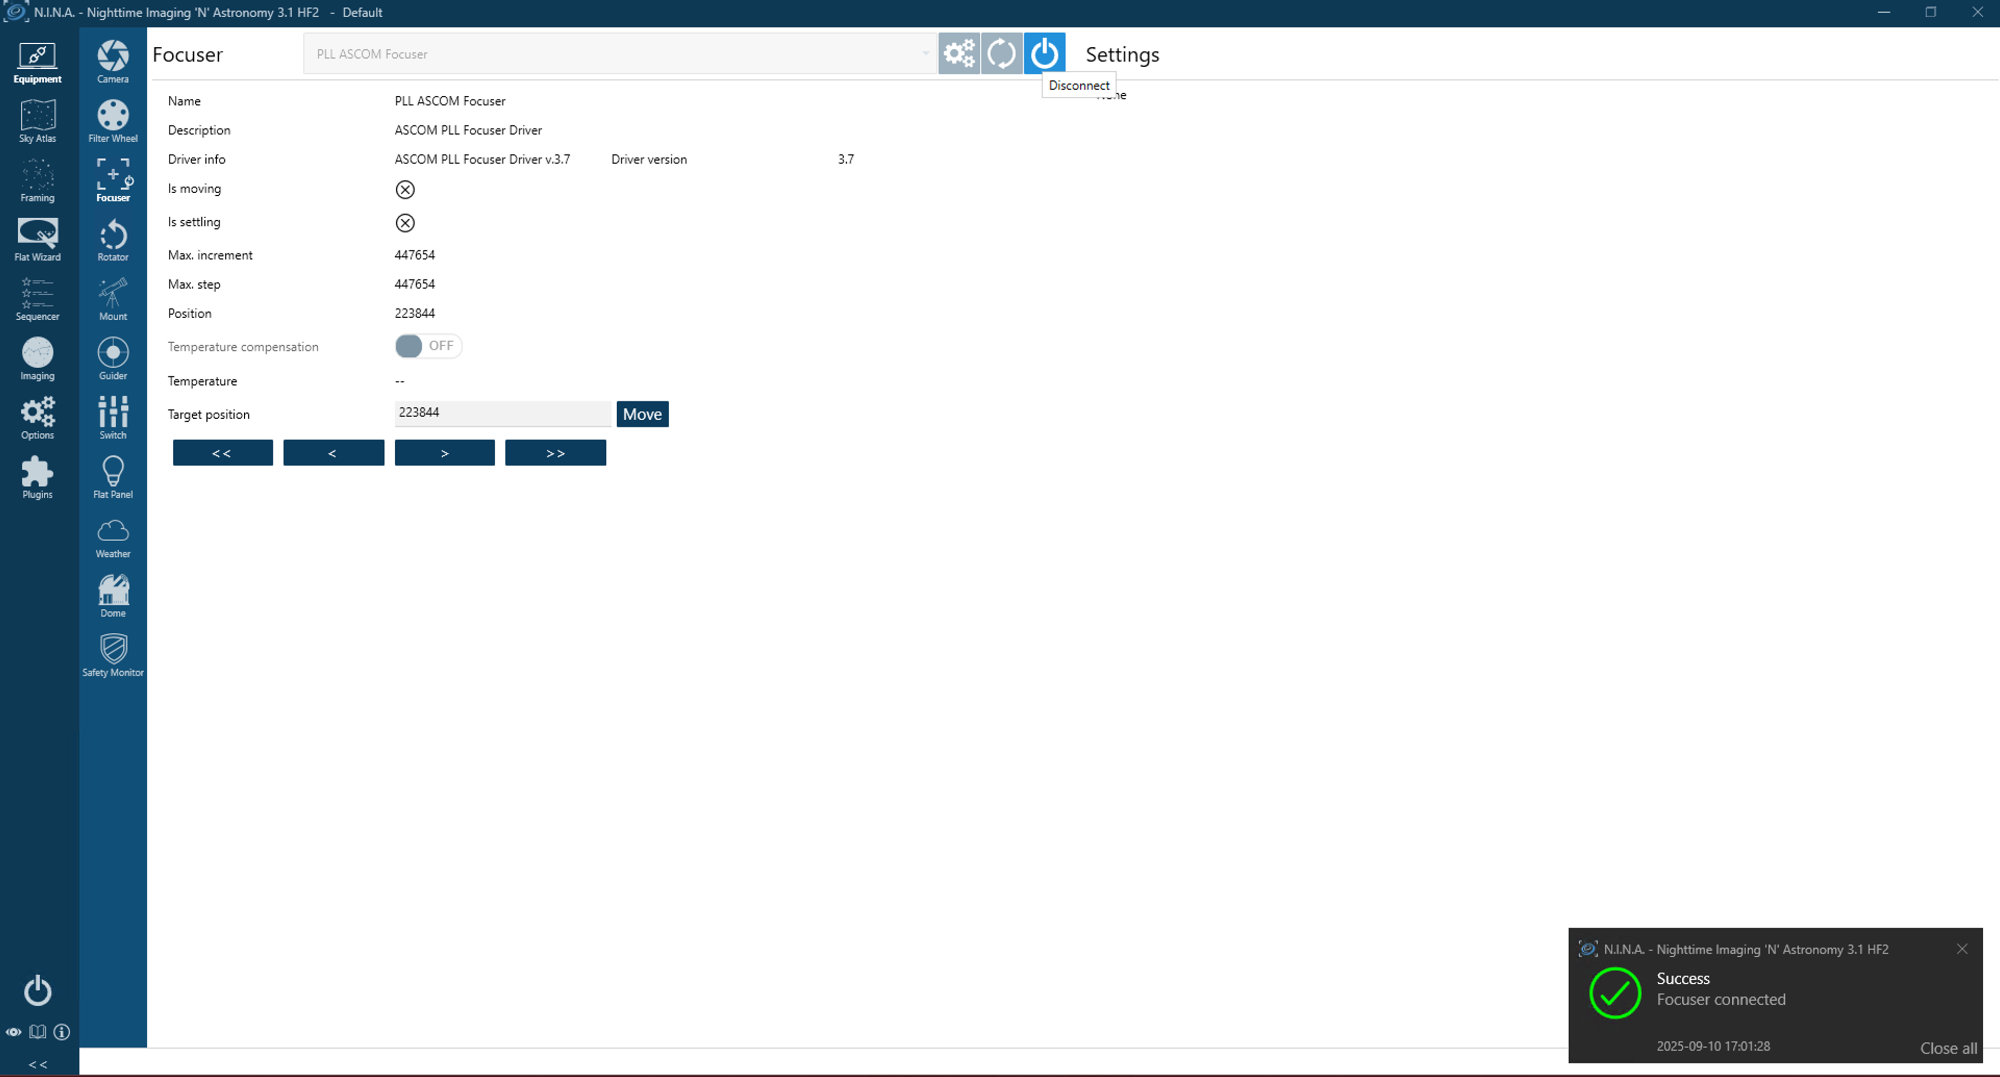
- In NINA, go to the Equipment tab and select Focuser.
- Choose the ‘PLL Focuser vx.x (ASCOM)’ from the drop-down list.
- Click on the gear icon and the ASCOM settings window will open. From the dropdown list choose the COM port to the one you wrote down in step 4 and press SELECT.
- Click the Connect button for the focuser.
Once NINA astronomy software connects to the focuser, information about the focuser will be displayed. Next, verify that NINA can control the focuser. Use the focuser controls on the Focuser tab to verify that the SESTO SENSO or ESATTO moves in and out as expected.
Note: erratic autofocus movements with direct ASCOM connection
In some configurations, when a third party software (like NINA) is connected directly to the “PLL Focuser (ASCOM)” driver, the autofocus routine may show irregular step movements with position reporting that may diverge from the real movement. This can be related to very frequent requests third party software sends to the driver during the autofocus routine. If you notice this behavior, we suggest connecting the focuser through the ASCOM Device Hub instead of selecting the PLL driver directly. Select “Device Hub Focuser” from the focuser list, then open the Device Hub settings and select the “PLL Focuser (ASCOM)” driver inside it. The Device Hub acts as a buffer between the software and the driver, and this restores regular and precise movements during autofocus.
Troubleshooting Your Connection
You’ll get an error message if SESTO SENSO and ESATTO fails to connect to your PC. The most common causes of failure to connect are no power, no USB connection, or wrong COM port selected during setup.
Ensure that focuser is connected to power (red power light indicates power).
Ensure USB is connecting. With Windows Device Manager open and the PORTS section expanded, confirm that the focuser connection appears and disappears when you plug in and unplug the USB cable. Write down the COM port number for the next step.
Ensure you have selected the correct COM port in NINA astronomy software. In the Equipment tab, select the Focuser tab. Highlight the PLL ASCOM driver, and click on the gear icon. Make sure that the COM port matches the COM port that appeared in Device Manager in the preceding step.
Setting Up Autofocus
Before you can use the triggers and instructions, you’ll need to set up Autofocus for your imaging system. Two of the most important parameters for reliable autofocusing are the Autofocus Initial Offset Steps and the Autofocus Step Size. Autofocus Initial Offset Steps should be set at 3 or 4. The Autofocus Step Size is specific to your system. To determine a good starting point for the Autofocus Step Size, begin by focusing the telescope using a Bahtinov mask. Remove the Bahtinov mask and note the position of the focuser. Then, zoom in to see the stars well, and begin looping short (1-2s) exposures.
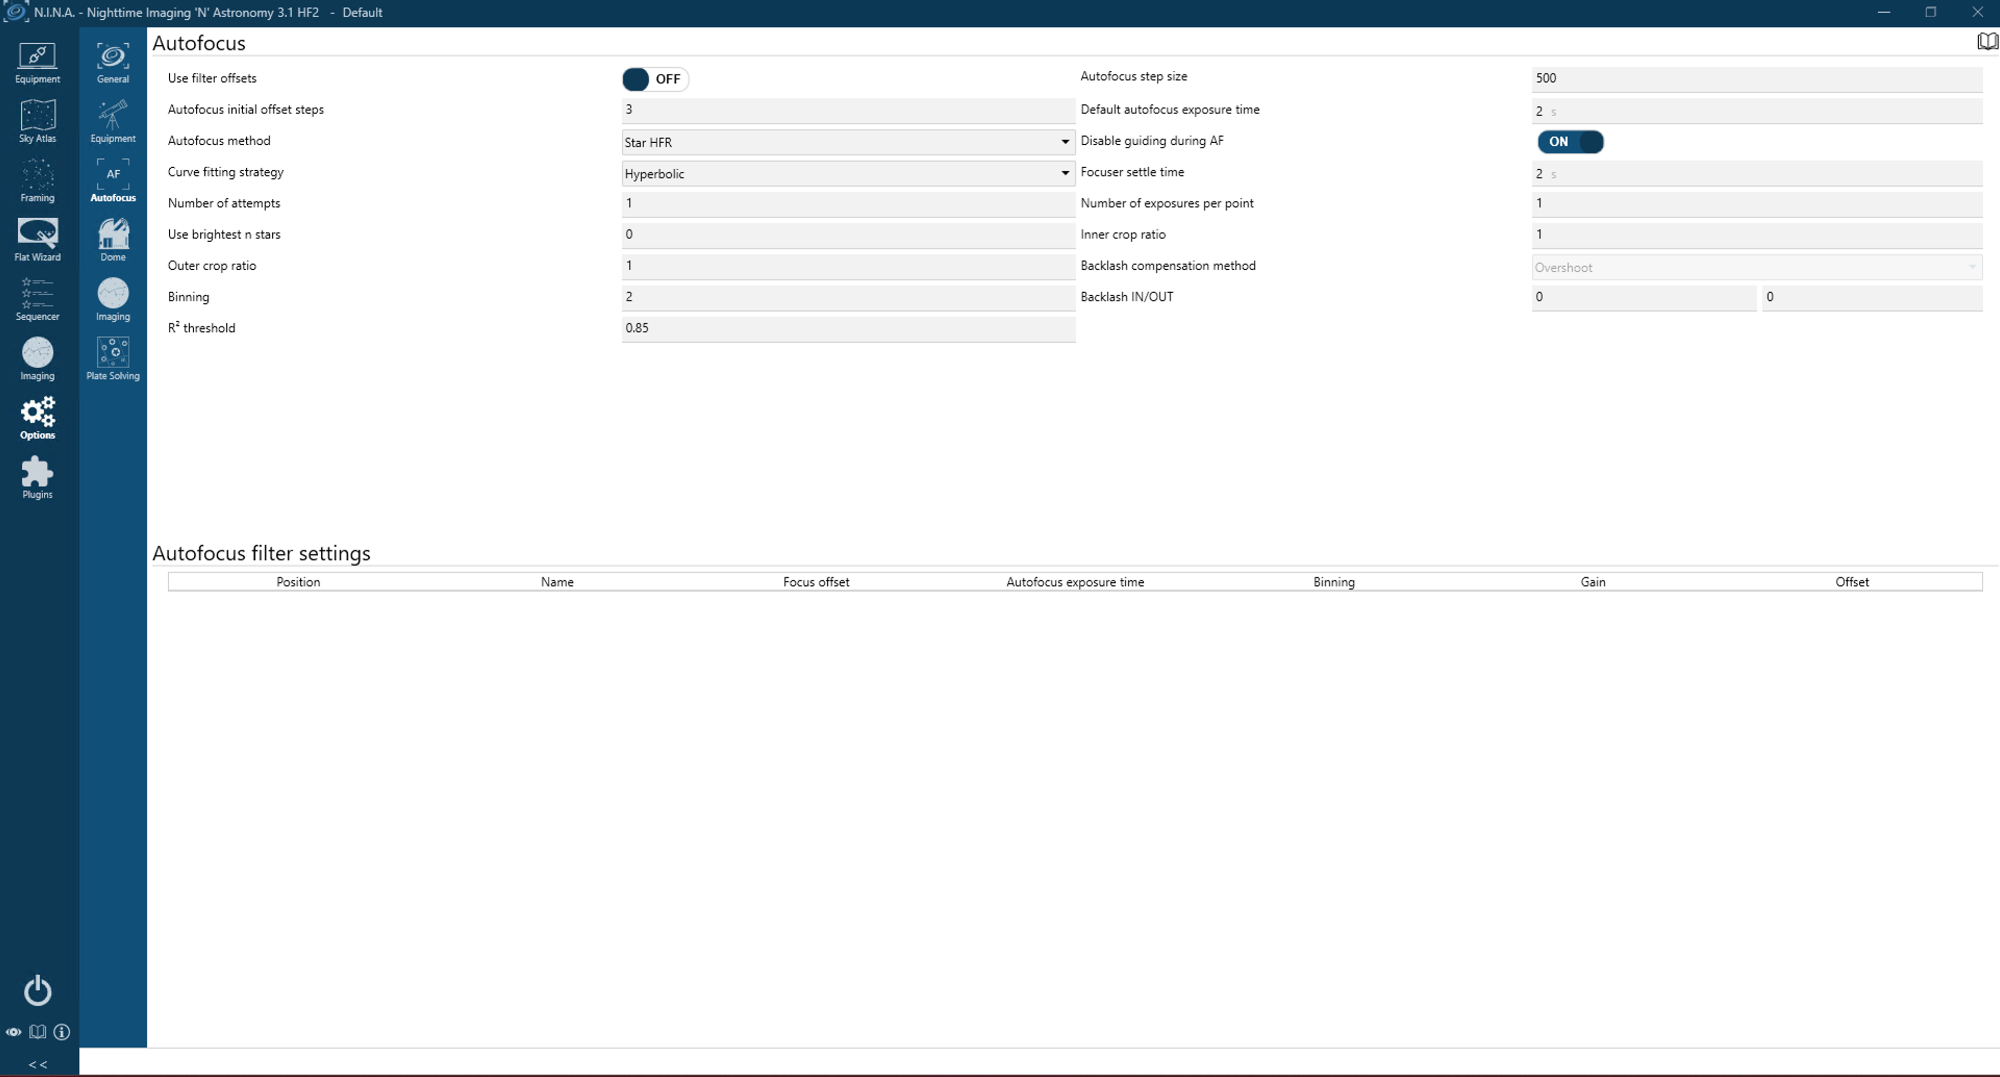
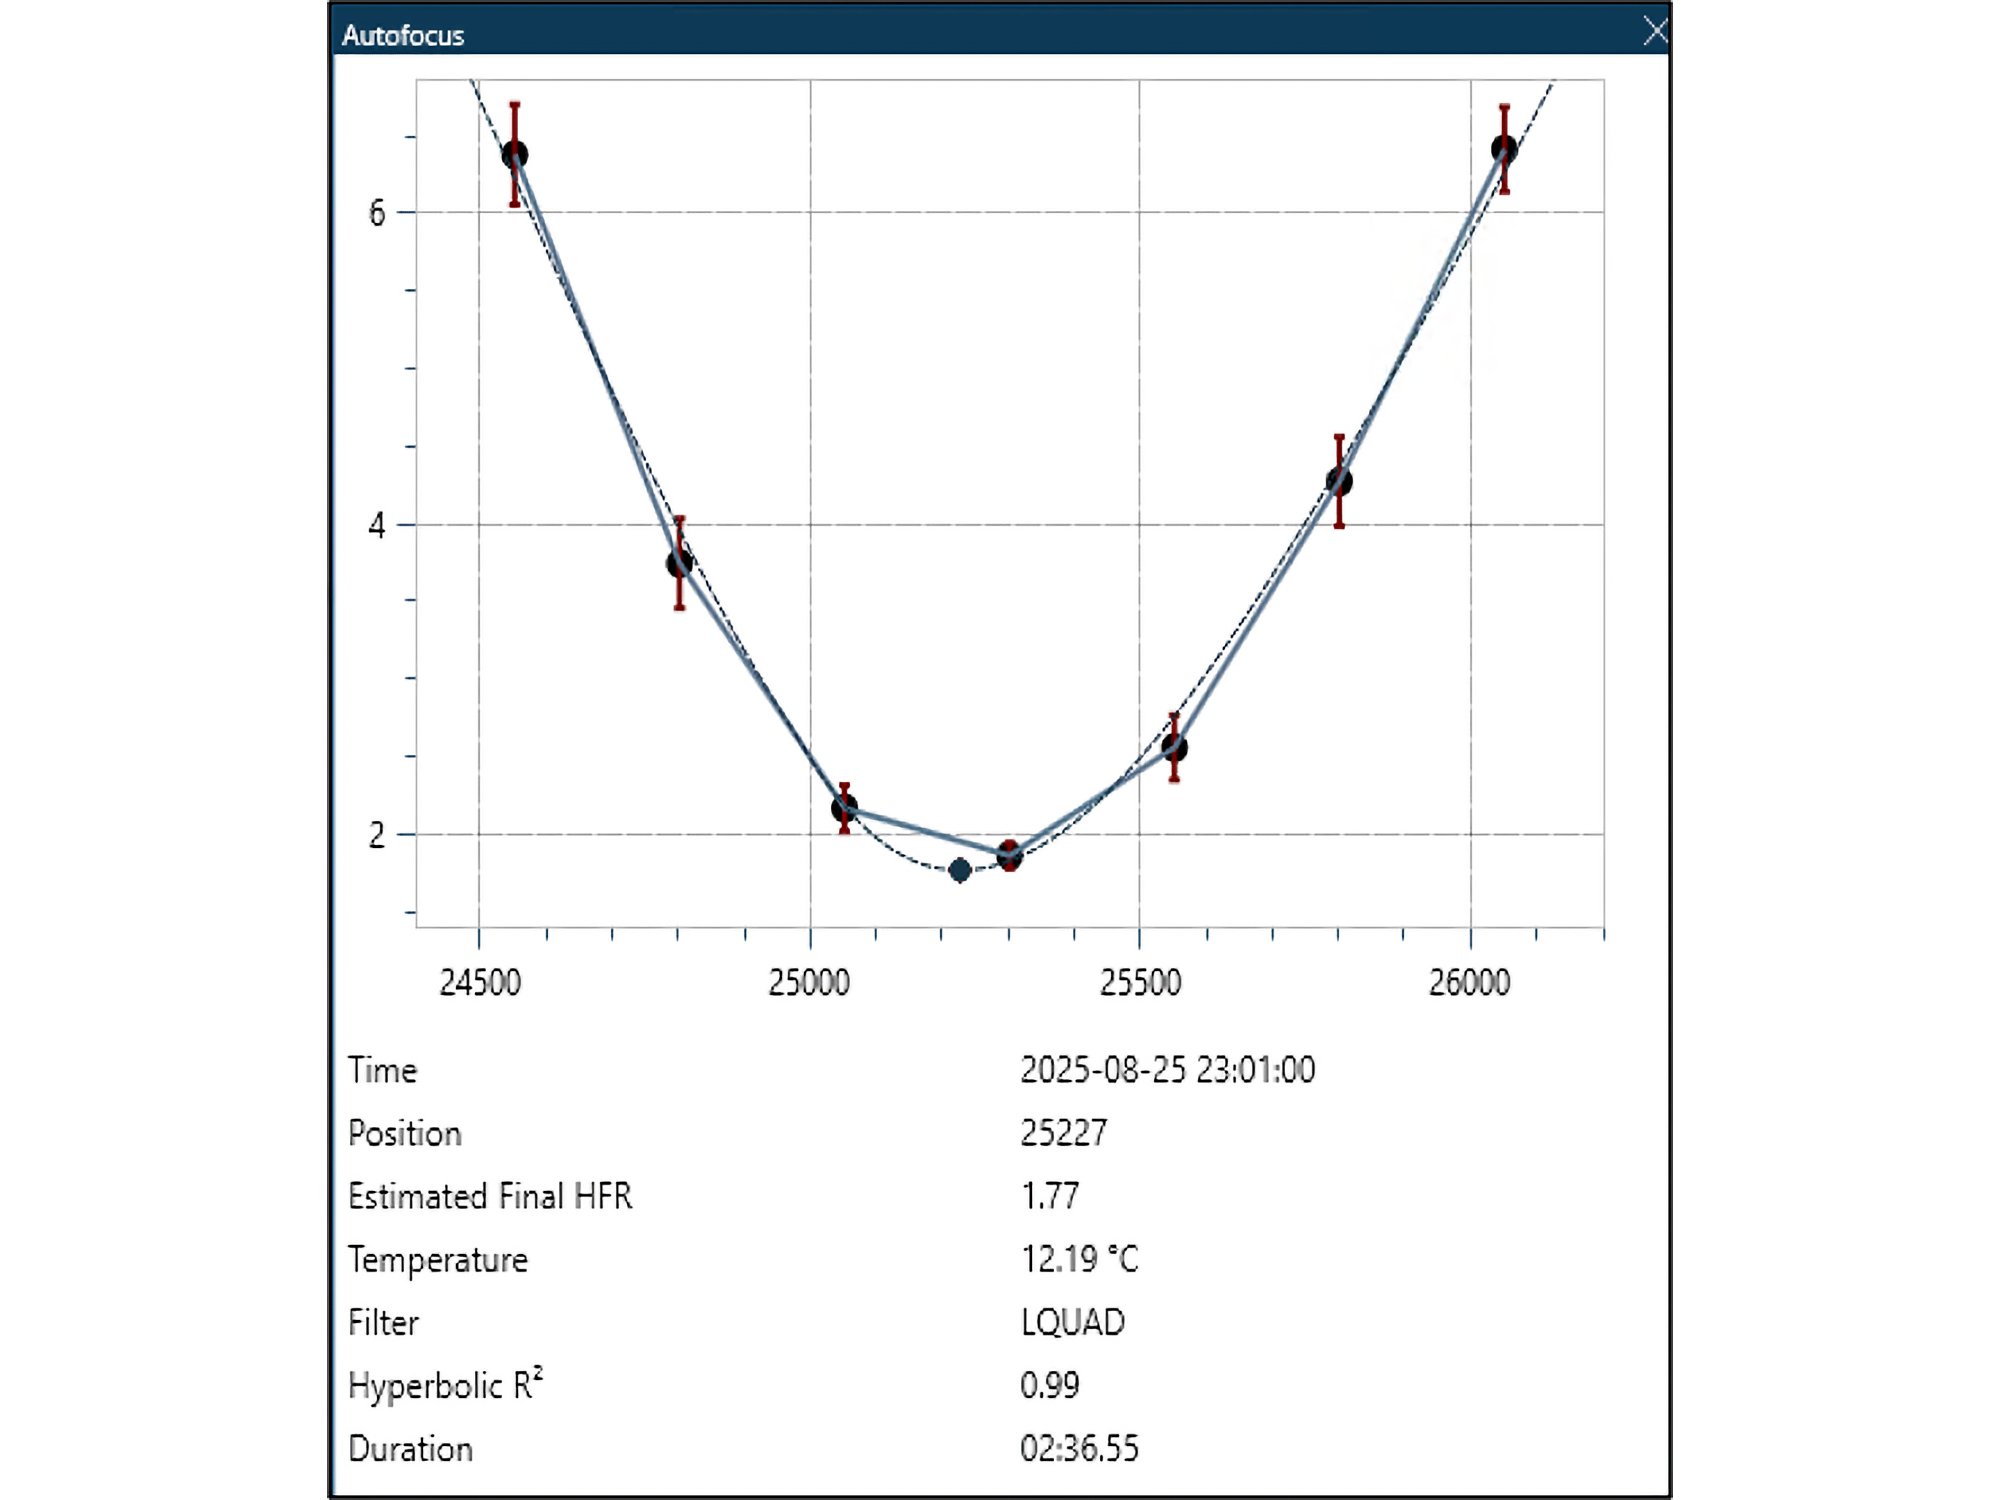
Move the focuser position out far enough that you can see that the stars are very slightly out of focus. Note the focus position. Use the difference between focused and unfocused positions as your Autofocus Step Size. For SESTO SENSO, try an Autofocus Step Size of 500. For ESATTO, try an Autofocus Step Size of 5000. Suggested starting values for other parameters are shown in the figure, but they should be optimized for your system by experimenting. A successful autofocus run looks like a ‘V’ and the shape of the autofocus curve is sometimes called a V-curve. Please see the detailed instructions from NINA astronomy software on optimizing autofocus parameters. Most parameters on the Autofocus Options tab have tool tips that appear when you hover over them.
Triggers and Instructions for SESTO SENSO and ESATTO
Triggers are conditional instructions that are executed only if a condition is true. They appear with a lighting bolt icon in the Instructions pane of the Sequencer tab. Triggers are evaluated after every exposure. There are five focuser triggers:
- autofocus after # exposures
- autofocus after filter change
- autofocus after HFR (i.e. star size) increase
- autofocus after temperature change
- autofocus after time
Triggers make it convenient to periodically autofocus only when needed, depending on your system and imaging environment. For example, Autofocus After Temperature Change checks the temperature after each exposure. Once it has fallen by the specified amount, an autofocus is performed. For example, if it is set to 3C, an autofocus is triggered only when the temperature has fallen 3C since the time of the last autofocus. You can use more than one autofocus trigger in the same imaging sequence. For example, you may wish to focus once every hour and after a filter change, or you may want to focus whenever the average size of stars has increased by 5%.
There are also four focuser instructions that can be placed anywhere in a sequence.
- Move Focuser
- Move Focuser by Temp.
- Move Focuser Relative
- Run Autofocus
The Move Focuser command will move to the specified focus position. The Move Focuser Relative command will move the specified number of steps in or out. The Move Focuser by Temp instruction can be used to get an approximate initital focus, based upon the temperature, and to adjust focus periodically as the temperature changes during an imaging run. To use this instruction, you will need to establish the relationship between focus position and temperature. This will require a temperature probe connected to the SESTO SENSO and ESATTO so that it reports temperature along with focus position. There is a plugin for NINA called Autofocus Report Analysis that can be used to determine the best values to use for the Move Focuser by Temp instruction. Run Autofocus can be inserted anywhere in a sequence to autofocus using the settings established in Options/Autofocus.
Tables 1 and 2 summarize the autofocus triggers and instructions, respectively.
Additional Resources
See the NINA Plugins tab for many useful plugins that can be used with various equipment. Check regularly for additions and updates.
Detailed documentation for NINA astronomy software is available at https://nighttime-imaging.eu/docs/master/site/
An introduction to NINA is available in Sky & Telescope, September 2023, p. 28-33
Table 1: Summary of NINA Focuser Triggers
| Autofocus after… | Use it to focus … | Benefit |
| Number of exposures | At regular intervals | Maintains good focus through changing conditions |
| Filter Change | When a filter is changed | Accounts for slight differences in focus of different filters |
| HFR (star size) increase | As focus worsens over time | Maintains good focus through changing conditions |
| Temperature Change | After temperature changes by a specified amount | Maintains focus as temperature changes |
| Time | At regular intervals | Maintains good focus through changing conditions |
Table 2: Summary of NINA Focuser instructions
| Focuser Instruction | Use it to … | Example of Use |
| Move Focuser | Move the focuser in or out to a specified absolute position | Set approximate focus position prior to Autofocus |
| Move Focuser by Temp. | Move the focus position by an an amount that depends on the temperature change since the last Autofocus | Place in between Take Image commands to automatically move the focuser as temperature changes |
| Move Focuser Relative | Move the focuser in or out by the specified amount from its current position | Set approximate focus position prior to Autofocus |
| Run Autofocus | Execute N.I.N.A. autofocus routine | Establish focus at the beginning of an imaging session. |
| Time | At regular intervals | Maintains good focus through changing conditions |